Monday, December 13, 2010
HAPPY HOLIDAYS - flathead tails with new potatoes, snow peas and beets with a sour cream and dill dressing
We had some pretty amazing seafood down in Ulladulla. Now that we have been back home for over a month now, I am still trying to cling onto those holiday ideals of great food, great weather, great fun!! especially now that Christmas has finally arrived..... I bought some flathead tails from the market (they are also called flathead fillets) We had some delicious beetroot to use up from the garden too. And so this salad was born and my family loved it. I think you could even serve this as a fancy Summer meal with friends! CHEERS!!
ingredients
2 to 3 flathead tails per person (get them boned at the fish market)
approx 1/2 cup plain flour
salt and pepper
vegetable oil
1 small to medium sized beetroot per person
3 new potatoes per person
approx 12 snow peas per person
1 tub of sour cream
fresh sprigs of dill
how to make your flathead tails with new potatoes, snow peas and beets with a sour cream and dill dressing
Grab 2 pots and fill each of them 3/4 full of water. Pop them over a high heat and bring to a boil. Peel your beetroot and cut into bite size pieces. Boil for approx 5 mins or until tender. Cut the potatoes in half and boil for approx 8 mins or until tender. Drain well and set aside.
Meanwhile, take off the stalky bits of the snow peas and place in a microwave safe dish with 1/2 cup of water and cook for 4 mins (depending on how many you are cooking - this is for 4 people) Drain well and set aside. Take out the sour cream.
get out a frypan and pour in some vegetable oil (the level should come up about 2cm high)Put it over a medium high heat. Lay some baking paper down on a bench and empty the plain flour onto the paper. Sprinkle with salt and pepper. Give it a little shake. Alternatively, do this in a bag and then pour it onto the paper. Lay each piece of fish onto the paper and lightly cover with the flour mix. Tapping off any excess. Check to see that the oil is ready by throwing in some of the flour. If it starts bubbling, it's ready. Pop in your fish and brown for a few minutes. Turn and then brown the other side. Done!
Now to assemble. Pop the snow peas on the bottom. give them a light sprinkle with salt. Add the beetroot and potatoes. Drizzle with sour cream and sprinkle over fresh dill. Place your flathead tails over the top and give it all good grinding of salt and pepper.
Merry Christmas Guys............See you 2011!!
berry jelly with passionfruit 2 ways
We were off to Roseville to catch up with some friends and finally see their new home. As usual, I was put in charge of dessert. I wanted to make something a little different this time. Cakes in Summer can be a kinda hard work...(I can't believe I just said that!) So I turned my thoughts to something fresh and frosty!
I think this might be the easiest dessert I've ever made. Strawberries; blueberries; jelly; frozen yoghurt and passionfruit pulp - yep, that's it! SO simple and yet SO delicious.
ingredients
The amount of the ingredients depends on the size of your dish and how many people you are making this for - the following amounts will serve 4 adults and 4 children
2 x packets of aeroplane jelly(I used strawberry but you could use raspberry or whatever flavour you prefer)
1 punnet of blueberries, washed
1 punnet of strawberries, washed, topped and halved
Passionfruit frozen yoghurt
passionfruit pulp (either fresh or tinned is fine too)
That's it!
how to make your Berry jelly with passionfruit 2 ways
Make the jelly (or 2 if you have a really large dish - make them separately and then pour into the dish)
Next, throw the fruit into the jelly making sure you see the lovely red side of the strawberries. Pop in the fridge. When it's set, it's ready to rock'n'roll.
Make sure everyone is seated and the plates and spoons are out on the table. Grab your icecream scoop and scoop out beautiful rounds of the frozen yoghurt, moving quickly. Then throw over the passionfruit pulp and wah-lah. Done!
I really wanted to try some crumbled up toasted marshmallows over the top. You know the ones that have the toasted coconut! I thought it could work but didn't get time to try it out. See what you think! Enjoy!
Tuesday, December 7, 2010
Baskets Filled With Summer...
I could feel a challenge coming. I'd ran out of time to go to the shops to grab some meat for dinner. I'd promised Hubby we'd have a BBQ. Didn't happen. Looking in the fridge and the cupboards I found: fancy pasta that was given to me for my birthday; a half block of tasty cheese; 2 cobs of corn; 1 zucchini; 1/2 cauliflower; some leftover ricotta and 3 slices of bread.... Can one make a meal out of this? Most definitely!
ingredients
2 cobs of corn, (260g of corn kernels)
1 zucchini, chopped into similar size as kernels (about 160g)
1/2 cauliflower
400g pasta (something like shells or baskets so you can stuff them)
50g bread crumbs
100g ricotta (I used fresh ricotta from the deli)
20g butter
1 tablespoon plain flour
3/4 cup milk
1 cup grated cheese
how to make your baskets filled with Summer
Get a large pot of salted water on a high heat. Pre-heat oven to 200C. Make breadcrumbs and set aside.
Cut kernels off cob and finely chop zucchini. Pop into a microwave proof dish, add 1/2 cup of water and microwave for 3 minutes. Drain and set aside. Chop cauliflower into florets and place in a microwave proof dish with 1/2 cup water and microwave for 5 minutes. Drain and set aside.
When water is boiling, throw in pasta and cook to manufacturers instructions.
Add 20g butter to a smallish pot and melt over low heat. Add 1 tablespoon of plain flour. Cook stirring until mix thickens. Gradually add the milk until sauce thickens. Remove from heat and stir through cheese and salt and pepper to taste.
Drain pasta. Mix ricotta through zucchini and corn kernels with salt to taste.
Stuff pasta with zucchini, corn, ricotta mix.Place in base of dish. Top with Cauliflower, cheese sauce and finish with bread crumbs. Pop in your oven until crumbs are lovely and brown and everything has heated through, about 12-15mins.
Serves 4. enjoy!
Tuesday, November 30, 2010
If I can make this, so can you! - Apricot TarteTatin
At the moment I am flicking through magazines and cookbooks in search of the perfect dessert! It'll be our Christmas treat when we catch up next with Caroline and her family. So many yummy things! So little time!!
I realised I couldn't wait till then so here we are, on the eve of Summer, and I thought I would try my luck at creating a Tarte Tatin recipe. I've never made one before but as they say there is always a first time for everything.
I used my tart tin, you know with the 6 tart moulds built into it. I thought it would be cute to make individual ones. When I brought them out of the oven I wondered how in the hell I was going to get them out. So I layed out some greaseproof paper and quickly flipped over the tin. Out came 6 beautiful little tarte tatins. I cannot tell you how excited I was. I had facebook status updates running through my head and all sorts of things. They looked exquisite. They even tasted exquisite. Enough said. Make them! Make them NOW!
ingredients
170g brown sugar
100ml water
50g unsalted butter
apricots approx 1 per tarte tatin (or you could use any fruit you like. I originally thought Mango but had some lovely ripe apricots so used those instead)
2 sheets of butter puff pastry
how to make your Apricot Tarte Tatin
Take out your pastry to defrost. Pre-heat oven to 180C.Get out the tin you want to cook the tarte tatin's in. In a small saucepan add the brown sugar and water. Stirring, bring to a boil and then turn down to a low heat. Simmer gently for a few minutes until mix thickens a little. Take off the heat and add the butter, whisking it through. (There will be enough caramel to make approx 18, 9cm diameter tarte tatins)
Add some of the caramel to each base. Add the sliced apricot (or fruit of your choice) and top with the pastry, ensuring that you tuck all edges into the pan.
Pop in the oven and bake for 20 minutes or until golden brown on top.
Get a knife and go around each tarte tatin then over a piece of baking paper, flip it over. They should all come out perfectly and this should blow your mind!!!
Serve immediately with vanilla ice cream. enjoy!
Friday, November 26, 2010
high tea - part 3 - broad bean puree with herbed oil and toast
This recipe, along with the previous two, were all swimming around in my head while we were away on our break. I'd been reading an article about Stephanie Alexander who was talking about Broad beans and how she liked to have the first few of the season, fresh. She made them sound sooooo moreish. So, not knowing a lot about them, I thought I'd have a play around.....and I still am really!
On the day of the high tea, everyone said that they really liked the puree (unless they were all being very kind!) There was something about the flavour I wasn't too sure about (I'd also forgotten to take off the 2nd layer of the bean which made the puree a little grainy - as Caroline's husband said, "It's like pesto") So I've re-jigged the recipe a little. In the original I added parsley to the puree but don't think it was necessary and also added a little too much oil. Hold back on those two and the true flavour of the broad bean really shines through. See what you think....
ingredients
serves 4
500g broad beans (pod them the night before. You'll need about a cup)
1 tablespoon salted butter
salt and pepper
1-2 teaspoons fresh ricotta
extra virgin olive oil
1 thyme sprig per person plus 2 extra
bread of your choice to serve
how to make your broad bean puree with herbed oil and toast
Put 1/2 cup of the olive oil into a bowl and add the 2 extra thyme sprigs. set aside. Just before serving discard thyme sprigs.
Pop oven on to 200C. Grab your bread and cut into rough slices (or however you like) Place them on a baking tray lined with baking paper and drizzle with some extra virgin olive oil. Pop in the oven for 10 -15 minutes, or until crisp.
Pop a saucepan of water on the stove. When boiling add the broad bean and boil for about 2 minutes. Drain. When you can touch them without burning yourself, take off the outer layer of each bean and discard. Now you are left with a soft and juicy green thing that looks like a large slightly morphed pea!
Pop them in your blender and add the butter and ricotta. Blend to a puree. Spoon into a bowl and add salt and pepper. Stir and check seasonings.
I thought these looked cute served individually but you can do one large dish, of course. Dollop puree into serving dish, drizzle with a little of the oil and then top with a sprig of thyme. Serve with the toast. Enjoy!
Tuesday, November 23, 2010
high tea - part 2 - spring pea morsels with dill and lemon creme fraiche
Whenever my Mother-in-law pops over for dinner I always do a roast of some description and she always brings along fresh peas.I don't know how that started but it's become a little tradition of ours. The roast and veggies go in the oven while we sit around, shell peas (and eat the occasional one too) and share stories.
The taste of fresh peas at the moment are out of this world!! It is Spring after all!.So that's really how this recipe came about. I wanted to use fresh peas and not too many other ingredients to make something yummy and simple. You don't have to serve them with the creme fraiche as it is a little expensive, I know. You could use sour cream if you prefer, or I've even popped these in pita bread with tomato sauce sauce for the kids and BBQ sauce for us - delish!!
ingredients
makes approx 15 - 20. Depending on how big or small you make them.
180g - 200g fresh peas, bit more than a cup of peas (you'll need approx 500g before podding)
1 large potato, cooked (Do this this the night before and keep it in the fridge until you're ready)
1/2 clove garlic, crushed
approx teaspoon of fresh chives, finely chopped
1 tsp baking powder
1 tablespoon of plain flour, plus a little extra flour for rolling morsels in
salt and pepper
about 125g creme fraiche (You could make double the amount of morsels and use the whole container of creme fraiche)
a few sprigs dill
about a teaspoon of lemon juice
Mix through the creme friache and the lemon juice and top with the dill sprigs. Make this just before serving. (I forgot to take a photo of the creme fraiche on the day so sorry you can't see the two together but it looks really pretty with the dill sprigs. Not to mention the lovely fragrance and the delicious taste!)
how to make your spring pea morsels
Shell the peas the night before so you won't have to worry about them on the day as it can be a little time consuming. (but sooooo worth it).Get the whole family involved!
On the day: Blanch the peas in boiling water for a minute or so. Drain and place in a blender (I use a stick blender which I LOVE!) add the garlic and give it a quick wizz. Now get out your potato and give it a good mash. Add the puree to it, along with the baking powder, flour and chives. Add salt and pepper to taste and give it a good mix.
Get out your fry pan pop in a good slosh of olive oil and set to a medium heat. Roll each morsel in flour lightly and set aside on a plate. When the oil has heated enough drop in the little morsels and fry. Try and pop them in all together so you'll have a similar cooking time for all of them. When lightly browned, flip over (Careful, it is a wet mixture and turn down to low so that they cook through but don't burn. Mine look just slightly overdone but they were still yummy!) When ready, drain on absorbent paper (if you like) and then pop on your serving platter with the dill and lemon creme fraiche on the side.
Don't forget the toothpicks so your guests can get at those morsels and woof them down! YUM-YUM.
Wednesday, November 17, 2010
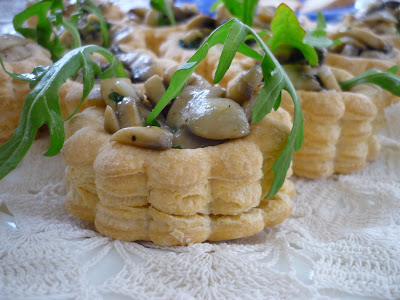
high tea - part 1 - herbed mushroom and ricotta vol-au-vents
While we were away we spent a couple of nights in Kiama either side of our break to stay with family. We decided to eat at a restaurant that had been around since I was little and I hadn't been there in years. It was time to have a taste of "Chachi's".
Hubby ordered the pasta with chorizo and the kids got pizza and ice cream (a winning combination in our household)and I had the crostini. Which reminds me of another story...... Some of the girls in my mothers group branched out a few years ago and created a book club. A recent book was, "The Road Home" by Rose Tremain. The main character Lev works in a fancy restaurant in London where the head chef makes the staff his famous crostini each night before their big night ahead.......I really had to have that crostini.
It was perfect. Delicious crusty bread, slightly salty ricotta, mushrooms tossed with garlic and fresh, fresh rocket leaves. So simple and so delicious. Here's my version in a vol-au-vent!
ingredients
makes approx 12 medium sized vol-au-vents(I used Erica's kitchen brand which had 6 in a pack but you could always use smaller ones if you are feeding more people or use a different brand - buy the best you can afford)
2 tablespoons butter
approx 12 button mushrooms, sliced finely
1/2 clove garlic, crushed
small mix of finely chopped fresh parsley and Fresh thyme
salt and pepper
fresh ricotta from the deli, about 150g
rocket sprigs, 1 per vol-au-vent
how to make your herbed mushroom and ricotta vol-au-vents
If you have the time, warm the vol-au-vent cases very slightly in the oven.
Heat butter in a saucepan over a high heat. Quickly fry mushrooms with the garlic, herbs and a little salt and pepper. When cooked through, adjust seasoning if needed and set aside. Dollop ricotta into the base of each vol-au-vent case. Top with mushroom mix and then add a sprig of rocket.
Serve as part of a high tea, afternoon tea, brunch or even a lovely light dinner. enjoy!
Tuesday, November 9, 2010
Heaven on a piece of toast - Pink Lady Apple and Strawberry Jam
My good friend Caroline from Fox Drink Water popped over on the weekend with her family for a morning of jam making! I was attempting to show them my skills and in the process nearly burnt the goods! but all was not lost.... it was rescued just in the nick of time. One more second and it would have made very fancy worm fodder.....
Over the next couple of posts I'll be sharing a few of my recipes that I tried out on Caroline and the fam. Two I am still perfecting and one I am very pleased with. My idea was to have a High Tea without boring old sandwiches, meat or eggs. I wanted it to be relatively easy too as we were meant to be concentrating on the jam! Caroline brought her absolutely delicious pumpkin scones that went down a treat!!!
The combination of Pink Lady Apple and Strawberry was something Caroline wanted to try (I think it is heaven on a piece of toast) and really you could use any apple that was in season. You could also use raspberries in place of strawberries if you like. I hope you give it a go!
Oh, and the absolutely gorgeous Jam and Toast holder will be for sale in our Etsy shop some time in the future.....watch that space!
ingredients
3kg pink lady apples, Peeled,cored, quarted and sliced (You should have approx 1.8 to 2kg once they have been peeled and cored)
500g strawberries, hulled and sliced in half
just under 1/4 cup lemon juice
some lemon zest if you like ( I popped in about a teaspoon)
2 cups or so of water
800g white sugar
how to make your pink lady apple and strawberry jam
Grab a large pot with a lid and as you cut your apple slices, throw them in. Throw in the strawberries and add your lemon juice, zest if using and water. Pop the lid on and and place over a high heat. Once it's boiling, turn it down to a very gentle simmer, stir occasionally, pop the lid back on and let the fruit very slowly soften. When the fruit looks very, very soft (the apple pieces should mostly look like mush with some pieces kind of holding their shape)Keep the lid off, add the sugar and turn up the heat. It shouldn't be long now till your jam is ready. Pop a few saucers in the fridge and every now and then grab one out and pop a teaspoon of jam. It shouldn't weep and when tilted the jam should stay and not be too runny. You can also push your finger through it (be careful it will be hot) if it wrinkles it's ready! Careful not to burn your jam as it can turn on you. Turn the heat down a little if you're unsure.
The sterilisation process
Wash your jars and keep them in hot soapy water in the sink until ready to use then rinse in hot water (don't dry them) and then place in the microwave, one at a time, for 1 minute. Have the lids in a saucepan of water on the stove on a rolling boil.
When ready, ladle into your jars right up to the top, pop your lids on tightly and then you can do one of two things: You can place them into a saucepan of cold water, ensuring the jars are well covered then bring to the boil and boil for 20mins to create a vacuum. After 20 mins, turn off heat and allow to cool in the water. Check jars that a vacuum was created.
OR
Once you've filled the jars turn them upside down until they have completely cooled. The old women of Tuscany use this trick which does work really well too however if using this method I would keep the jam in the fridge once it had cooled down.
Keep boiled jars in a dark, cool cupboard. They should keep for up to 1 year.
Wednesday, November 3, 2010
Honey Roasted Pumpkin Salsa
We've just arrived back from 2 glorious weeks down the South Coast. It's been heaven eating out nearly every night or buying fresh fish from the markets and cooking it simply on the BBQ. Other than that I've hardly cooked at all (except for the previous blog post - but you can hardly call that cooking!). One of our favourite places to eat over the past couple of weeks has been a humble pie place called, Hayden's Pies. They have everything from: Masaman curry; Roast chicken and leek; Chunky steak with mashed potato; Atlantic salmon and king prawn, to name a few. One pie in particular caught my eye - Honey roasted pumpkin with spinach and feta. It's difficult to describe the taste but I simply couldn't get enough of them! I had to do something with this. I had to roast pumpkin in honey!........It's not a salsa as such, I know, but the coriander and the lime definitely take me there. Enjoy!
ingredients
piece of butternut pumpkin (enough to give you about 250g) peeled and chopped into bite size pieces
tablespoon of honey
100g sugar snap peas, topped and blanched
small handful of coriander leaves
a few sprigs parsley
small handful of beetroot leaves
1 lime
how to make your honey roasted pumpkin salsa
Pre-heat oven to 200C. Place bite size pumpkin pieces onto some baking paper on a tray, drizzle with the honey and bake for 40 mins. (You want the pieces to cook through but not char)
Just before the pumpkin is ready blanch the sugar snap peas and wash the leaves and the herbs. Drain well.
In a bowl toss everything together gently and season with salt and pepper and a good spritz of lime juice.
Serve with a wedge of lime. Serves 2 as a light lunch or serve with lamb cutlets or fish for a more substantial meal.
Thursday, October 28, 2010
Treat please! - Halloween Rocky Road
With our new Etsy shop I'm getting really inspired by up and coming holidays and events. One of them being, of course, Halloween. Some of us celebrate it in Australia and some of us don't. I remember last year making up these cute little lolly bags for little trick or treaters.....and darn it, nobody came! but seeing all the amazing imagery and colours on Etsy it really got me thinking. So here's my version of a Rocky Road - Halloween style.
In my mind the apricots represent pumpkins, while the other elements - toasted coconut and choc coated sultanas.....well, I'll let your imagination run wild with those ones. I've brought it all together with some dark chocolate and biscuits. I'm sure it doesn't even have to be Halloween to enjoy these treats!
ingredients
dark cooking chocolate, melted
Turkish apricots, kept whole
choc coated sultanas (or you can use choc coated nuts if there are no allergies)
Shredded coconut, toasted (either in the oven or under the grill but keep an eye on it as it turns very fast)
Savoiardi sponge finger biscuits, chopped into 7 or 8 pieces each
How to make your Halloween Rocky Road
We are on holidays at the moment so I am away from my usual kitchen. I didn't use scales or any cup measurements. I kinda just used the force. This recipe is pretty simple though. Just grab the tin you would like to use (something with highish sides) line it with baking paper and go for it.
Throw in some pieces of biscuit, some choc sultanas, a few apricots and some toasted coconut. Melt your dark choc and pour it over the mix. No need to stir, it should ooze into the crevices! Now top with a few extra apricots, choc coated sultanas and a sprinkling of toasted coconut. Pop it in the fridge to let it all set. (I used a loaf tin. We went down to the beach for half an hour or so and it was ready by the time we got back)) Chop it up into chunks and serve. If making the night before, just make sure to keep it well covered with cling film in the fridge otherwise the biscuits will dry out.
You could wrap pieces up in some greaseproof paper or a cute cellophane bag and tie with an orange and black grosgrain ribbon. Trick or treat anyone?
Saturday, October 23, 2010
a little bowl of sage and sunshine - warm spring salad
Wehave an abundance of Sage in the garden at the moment. It looks so beautiful and healthy. I thought about using some of it in a traditional stuffing or baking it with some pork and apples or I wonder if an apple and sage tart tatin would work? and then I thought about a very humble Italian pasta with sage leaves and butter......
At the market I just couldn't take my eyes of the asparagus! They are soooo cheap at the moment and so.... perfect looking. I LOVE risoni (as you can probably tell by now)and I'm a big fan of, well a lot of things! but cheese, mushrooms and broccolini seemed like a perfect match....
I threw it all together for a delicious and quick meal. enjoy!
ingredients
1 cup risoni, cooked (or you could use any pasta you like)
50g salted butter (to start and another 20-30g if you think it needs it)
300 - 350g mushrooms, sliced into smallish pieces
1 bunch broccolini, kept whole, blanched
2 bunches asparagus, cut in half, blanched
sage leaves (a small handfull)
freshly grinded black pepper
lemon juice
peccorino cheese, shaved into ribbons
how to make your warm spring salad
Get your pot of water on to boil. (If you are going to blanch your brocolini and asparagus you can do that when the water starts boiling, otherwise you can microwave them and set them aside) When boiling add a pinch of salt and 1 cup of risoni. Now you've got 8 minutes to cook everything else.
Grab a large frypan and place over highest heat with the butter. When the butter is really going nutty and has all melted throw in your sage leaves. Let them sizzle for a minute while giving them a stir. Now throw in the mushrooms with a pinch of salt and toss them around. (add more butter if you think it needs it) When they are cooked through, add your vegies, the well-drained risoni, lemon juice and a good grinding of black pepper. Toss through and take off the heat. Pop it all into a large salad bowl if serving as a side dish or plate up individual bowls. Serve with beautiful large strips of pecorino cheese and extra grindings of black pepper and a wedge of lemon.
Saturday, October 16, 2010
I'm still in a European state of mind - yoghurt, honey and thyme cakes
This is my fool proof muffin mix used a different way once again. This combination has been done before,I'm sure of it, I know it! but I've never had it. Sweet things and herbs - together - just sound so exotic to me! So I really just wanted to have a little play around with the flavour combination to see what happened. The result? 1 very chuffed cook, 1 happy husband, 2 happy ankle biters and 1 happy Mother-in-law! I hope you enjoy them too!
I've made this mix even easier so all you have to do is weigh the ingredients as you go. Just don't forget to zero it after each addition!
ingredients
220g self raising flour
80g caster sugar
75g olive oil
125g greek style yoghurt
70g milk
1 x 56g egg
30g - 40g of your favourite honey (I've used the lavender honey by Bees in Bowties again. I know - I am in LOVE!)
approx a teaspoon of fresh thyme (leaves only and keep some aside to put on top)
how to make your yoghurt, honey and thyme cakes
Pre heat your oven to 180C and line your 12 hole muffin tin with cases or spray with an oil spray.
With a spoon mix together the flour and the sugar in a bowl. set aside.
In a jug whisk together the olive oil, yoghurt, milk and the egg very lightly. Pour into the dry ingredients and whisk gently until all just combined. Add the honey and the thyme and stir through gently.
Spoon a good dessert spoon full into each hole in the tray until you have used up all your mix. Place the remaining leaves on the top of each cake. No need to press them in, they'll do their thang. Place in the oven for 18 - 20 minutes. Allow to cool slightly on a cooling rack before serving.
I have to say we even had these with a cup of tea the next day for a quick and yummy breakfast......mmmmm
Sunday, October 10, 2010
Fetta and Silverbeet Banitsa
This is one of my all time favourite snacks. I hadn't made it in absolutely ages. It's one of those treats I make when the weather gets a little warmer. You do need to use the oven but I always let the banitsa cool down first before devouring PLUS it's best eaten outside (so the ducks can eat the crumbs!!)
You can add silverbeat to the cheese or just enjoy a simple fetta banitsa.Share it with friends over some beer or a sweet white wine. It's something I grew up with and always reminds me of home. You could even throw some fennel seeds and salt flakes and ground pepper over the top before baking or you can always mix some fresh ricotta with the fetta for a change. Have a play around!
ingredients
1 pack antoniou filo pastry (from the fridge aisle in the supermarket)
400g south cape greek style fetta cheese
150g butter, melted
bunch of silverbeet, blanched and then squeezed dry (if using)
how to make your banitsa
Pre-heat your oven to 180C and grab 2 x cake tins or 1 large one. Line your work benches with some baking paper (large enough to lay the sheets of filo pastry out flat).
Melt your butter in the microwave in a microwave safe dish (for about 30 secs) set aside.
Grate your feta cheese. I buy the 200g packs so I usually grate one pack per banitsa, so I know the same amount of cheese is in each one. If using silverbeet, have it all ready to go. (sometimes I make one using silverbeet and cheese and the other just cheese but you could make both just with the cheese - it's totally up to you)
Now, take out your filo pastry from the box and lay it out on one of the sheets of baking paper. Bring one sheet of pastry over to the other sheet of baking paper and lay it down. Drizzle an even layer of the melted butter. Grab another sheet of pastry and lay it over the top of the piece you just drizzled butter over. Drizzle some more butter. Grab another sheet and lay it over the top. You should now have 3 sheets on top of each other. Now grab some fetta cheese and make a line lengthways, a mini mountain you could say. Roll it up lengthways and then twist into a snail. This will be the heart of your banitsa (and the yummiest, meltiest part!) Continue on with the other sheets except instead of making into snails you will place the rolled up filo around the heart. (See pic if unsure)until your tin is full. Then, it's on to making your other banitsa.
When finished scatter some fetta cheese over the top of each banitsa and throw in the oven. Bake at 180C for 30 mins until crispy and lightly browned.
Please be careful when it comes out of the oven, the filling will be very,very hot. Let it cool but don't worry the cheese retains it's yummy gooiness. yum yum!
Monday, October 4, 2010
The Gruffalo likes Sweet Potato, Banana and Honey Slice!
Sounds weird but tastes delicious, I promise.
"Bake your Cake and eat it too" by Tamara Milstein was the very first cookbook I bought myself. It was all about cakes (what else!) If you see it around I definately reccomend it. It might look a little ancient as the book is broken up into regions, for example: The cakes of Europe; The cakes of Asia Pacific and so on. But there is so much to learn and gain with this book; so many techniques, so many different flavours - I myself have made the Vietnamese Mango cake, the Greek coconut and fig cake and the Indian carrot cake, to name just a few. One of my favourites from this book was a 'Sweet Potato Date Cake' (from the Middle East secton of course) I'd been thinking about that cake eversince I made the Sweet potato, chickpea and risoni salad; but I wanted to make it mine. So I ditched the dates, the walnuts, the nutmeg and the cinnamon, decided it would become a slice, adjusted the butter, sugar and flour and added some ripe banana and a wonderful Lavender honey. The result? Something that the little ones love (and my love affair with sweet potato continues...)
ingredients
1 large sweet potato, after you have peeled it you will need 300g, cubed
100g unsalted butter, cubed and softened
90g caster sugar
2 eggs
100g Self raising flour
1 mashed banana
1-2 tablespoons honey (or approx 30g - I used lavender honey by Bees in Bowties)
how to make your Sweet Potato, Banana and Honey Slice
First of all, peel your sweet potato and chop into bite size pieces. When you have 300g, pop it into a microwaveable container with 1/2 cup of water, cover loosely and microwave for 5 mins. Check that they are all cooked through. Drain off the water, mash with a fork and set aside to cool. At least 20 minutes.
Pre-heat your oven to 180C and line a slice tin with some baking paper. Beat the butter and sugar with an electric mixer then add the sweet potato. Add the eggs one at a time and beat well after each addition. Add the flour, the mashed banana and the honey. Mix through with a spoon then pop into your tin, levelling the mix. Bake in the oven for 30 mins or until a skewer comes out clean. Cool slightly, dust wth some icing sugar and cut into slices. Makes approx 18 squares. Yum!
If you wanted to go totally crazy (and why not!) you could top the slice with a cream cheese frosting. 500g cream cheese, softened; 1 tsp vanilla extract; 3 1/3 cups (500g) icing sugar - beat cream cheese using electric beaters until smooth. Add vanilla and beat well. Gradually add icing sugar, beating until smooth and creamy. Spoon onto slice and serve. If there were no allergies you could even sprinkle over some toasted walnuts.
Thank you Katrina for the tix to The Gruffalo show and a big HI to the girls in my mothers group who read my blog!
Sunday, September 26, 2010
Bring out the ouzo! - Mykonos Toasted Sandwich
Idon't always plan the family meals for the week. Usually I like to buy a few things and then see what we all feel like. However, last week I had about 5 nights of meals sorted. 3 of those happened, one remains on hold in the freezer and the other, well it morphed into something else. I was all set for making my stuffed capsicums and then I just didn't feel like it. The weather was hot and dry and I felt like something light and summery. I had to use up some greek yoghurt and salad and suddenly I was taken back to the Greek Islands all those years ago. For every meal, as I travelled around the islands, I enjoyed home-made Tzatziki, wild grown tomatoes, crusty bread and usually a yeeros filled to the brim with lamb. Here is my version of those simple dishes smashed together and made into a steak sandwich. Opa!
ingredients
Serves 2 adults and 2 children
Lamb and marinade
500g lamb strips (You want large strips [see pic]. The kind you can sear on each side for a minute or two easily with tongs. Thin and small stirfry strips won't really work in this dish)
1/4 teaspoon ground cinnamon
1 teaspoon ground allspice
1 teaspoon ground coriander
a good grinding ground pepper
about 2 tablespoons lemon juice
1/2 cup mint leaves, chopped
a dash of olive oil
tzatziki
200g greek yoghurt (I like Jalna brand for its thickness)
1 small lebanese cucumber, skin on, chopped finely
1 garlic clove, finely diced
lemon juice to taste (1 to 2 teaspoons)
ripe tomatoes (3-4 slices per sandwich, very lightly salted)
baby lettuce leaves
8 slices of whatever bread you'd like to use, well toasted
butter (for the lettuce side)
how to make your mykonos toasted sandwiches
first of all, make your tzatziki. In a plastic container with a lid add the yoghurt, diced cucumber, diced garlic and lemon juice. mix well, pop on the lid and put back in the fridge until your ready.
Now wash your tomatoes and lettuce, lightly salt the tomatoes and set aside.
Pop your bread in the toaster ready to push down; or if using thicker bread then pop under the grill.
Pop the lamb strips into a bowl with the remaining 7 ingredients and give it a good toss together.
Throw a dash of oil in a pan and put it on high heat. When really,really hot pop the bread down in the toaster and then place each piece of meat in the pan. Allow a minute or so then turn over and cook for another minute or until done to your liking.
Butter one side of the toast and lay the lettuce and tomato on this half. On the other half spread the tzatziki, then lay some of the lamb strips and serve immedately.
If your unsure whether your kids will like the tzatziki you could always use less garlic or go for something else like hommus.
Wednesday, September 15, 2010
Pear and Ricotta Tarts with Fox Drink Water Syrup
My very good friend, Caroline and I have put together a little store on Etsy; you can find us here! If you are in need of something Vintage and Fabulous and Kitcheny, then check it out!
To celebrate our efforts in putting this shop together I wanted to create a scrumptious dessert that reflected both of us; something that we would devour in 5 seconds flat! Having recently been spoiled to a wonderful breakfast of pancakes, Caroline also made her unbelievably delicious brown sugar syrup. So I created a tart that would have to incorporate this liquid yumminess.You can see her wonderful recipe for pikelets and brown sugar syrup here. I hope you enjoy sharing the tarts with your friends and we hope you enjoy perusing our little vintage shop! (We are still to add a few more pieces but we will get there shortly, drop in and say 'Hi'.)
When I first started creating this recipe Quinces were still just in season so I have included the details for that so when next season rolls around you'll be able to give it a go too!
ingredients
For the Quince Tarts -
approx 2 quinces (you will need 1 quarter per tart), stewed and cooled. (Just make sure they are not stewed for too long otherwise they will be too mushy)
250g ricotta cheese - Perfect Italiano Brand from the cheese section in the supermarket
1 egg yolk
2 tablespoons caster sugar
2 teaspoons plain flour
2 sun-ripened figs (Angus Park do a pack of these that aren't dried and are very scrummy)
For the Pear and Ricotta Tarts -
2 pears, Don't peel and core them until ready to assemble - I used just ripe Josephine pears
250g ricotta cheese - Perfect Italiano brand from the cheese section in the supermarket
1 egg yolk
2 tablespoons caster sugar
2 teaspoons plain flour
2 tablespoons of dried currants
For the Sweet Shortcrust Pastry -
150 g Plain flour, sieved
Pinch Salt
85 g Unsalted butter, cold and cut into rough cubes
1 Egg yolk
1 - 2 tbsp Cold water
25 g Caster sugar
how to make your Pear and Ricotta Tarts with Fox Drink Water Syrup (or Quince Tarts with Fox drink Water Syrup)
*makes six 9cm diameter tarts
First of all make your pastry so you can pop it in the fridge for half an hour or until ready to use.
Put the flour, sugar, butter and a pinch of salt in a food processor and process briefly - to make fine breadcrumbs.
With the machine running, add the egg yolk and continue to process. Add a little water until it just comes together.
If making the pastry by hand, rub the butter into the flour until it resembles coarse breadcrumbs then, using your hands, add the egg yolk and just enough water to bring it together.
Flatten it out as it will be easier to roll out then wrap in glad wrap and pop in the fridge.
Pre-heat oven to 180C. Roll out the pastry between 2 pieces of glad wrap or glad bake until it's about 1/2 cm in thickness. Cut into 6 rough squares. Spray your 6 9cm diameter tart tins with oil spray(I have a tin that's like a muffin tin except it's for tarts! It was a wedding present from family, one of the best presents ever!!) and then press the pastry into each tin. Tidy up edges roughly they should look a little rustic.
Next, grab a bowl and whisk the ricotta, plain flour, egg yolk and caster sugar together until smooth. Stir through the currants (or figs). Pop into each pastry lined tart tin then top with thinly sliced pear (or quinces). Pop in the oven for 20 - 25 mins, until pastry is cooked and mixture is set.
Leave to cool in the tins for 5 - 10 mins (before then it will be too tricky to get them out unless of course you are giving each person their own individual tart in a tin - that would look kinda cute!)
Pop on a plate and drizzle liberally with the delicious Fox Drink Water Syrup. Enjoy!
Monday, September 6, 2010
spring-a-ding-ding - Sweet potato, chickpea and risoni salad
Chucking fresh herbs in a salad, especially when you've grown the herbs yourself, is one of the best things! This is my favourite salad and I know that there are many salads similar to this one but I can honestly say I threw this one together out of desperation when I was pregnant with my first child. My cravings consisted of anything fresh: fruit, salads, asian broths - I had never been so healthy in all my life! One vegetable though I ate practically everyday was sweet potato. I couldn't get enough of it. So, this salad was born and we still LOVE it. Whenever there is a touch of warm weather I always throw it together for a quick and easy meal. There are no hard and fast rules with this dish, just make sure everything is beautiful and fresh and it will definately take you to a sunny place!
ingredients
1 large sweet potato, peeled and chopped into bite size pieces
half piece of butternut pumpkin (if you like), peeled and chopped into bite size pieces
1 zucchini, chopped into 4 pieces
1 spanish onion, peeled and chopped
1 400g tin chickpeas, drained and rinsed
1 teaspoon ground cumin
1 cup risoni, cooked
1 bunch coriander
1 bunch parsley
1 lemon
salt and pepper
extra virgn olive oil
how to make your sweet potato, chickpea and risoni salad
Pre heat your oven to 180C. Chop up your vegies and throw on a baking dish and drizzle with some extra virgn olive oil. Pop in the oven for about half an hour. You'll need to check them every now and then as the cooking time depends on what size you have chopped your vegies.
Heat up a frying pan gently with some olive oil and throw in your chopped spanish onion. Sweat over a low heat until very soft. Now pop a pot of water on the stove over a high heat. When boiling add your cup of risoni. (You could omit risoni and use cous cous instead)
Back to the onion, add the cumin and give it a stir until fragrant then throw in your chickpeas and heat through until soft.
When risoni is cooked, drain. Grab a large bowl, throw in: the onion,chickpea mix,the vegies and the risoni. Now throw in your roughly chopped herbs, some salt and pepper to taste and a good spritz of lemon juice. Give it a good toss, check seasonings and throw in a serving dish. voila!
Beautiful served warm straight away but also yummy cold the next day!
Tuesday, August 31, 2010
The last day of Winter - Casserole Ruby Lou
With the weather surprising us with its warmth we have been having friends over for BBQ's (allready!). This last weekend some friends brought us some amazing AC Butchery snags (Goat; Turkey and cranberry; chicken and rocket and good ol'beef)How I have missed them!
I threw together a few things: some roasted root vegetables, caramelised onions, a pumpkin, chickpea and risoni salad and a salad made up of little treats from our garden. When the weekend was over and I had to think about what I was going to put together for a mid-week meal I noticed that I still had a mountain of Ruby Lou spuds to get through........The evenings are still chilly at least. The perfect excuse to create another casserole.
ingredients
1kg of beef chuck steak, cut into large chunks
5 pickling onions, peeled and halved
1 large carrot, peeled and chopped into chunks
8 - 10 Ruby Lou potatoes, halved (or you can use any potato that keeps it's shape after slow cooking)
1 cup of red wine (I used Hippies Shiraz but you could use any red wine you love)
1 and a half cups beef stock
1 x 800g tin tomatoes
2 large sprigs rosemary
about 8 peppercorns
300g button mushrooms
how to make your casserole ruby lou
Pre heat oven to 180C
Pop some oil in a large pot and put it over a high heat. Add the steak in 3 batches, browning the meat and then putting it aside until all cooked. Turn the heat down a little and throw in the spuds, carrot and onions until softened. Pop the meat back in and add the wine, stock, tomatoes, rosemary and peppercorns. Bring to the boil. Once boiling, throw it in a casserole dish, cover it with foil and bake for 2 hours. After 2 hours, throw away the foil, chuck in the mushies and cook for a further 45 mins.
Serve it with broccoli spears and red wine. Perfecto!
Tuesday, August 24, 2010
B-Day - Nan's Moussaka
Every Sunday, when I was growing up, all the family would head over to my grandparents place for lunch. We always had something delicious, usually a roast and if it was your birthday you got to choose whatever you wanted. Some people liked roast chicken, others roast lamb but me, I LOVED Nan's Moussaka.
The best part about making this dish is cooking the flat chips of potatoes. So heavenly. You can almost eat your fill while making it!
ingredients
1 brown onion, finely chopped
500g mince
approx one kilo of potatoes (you may need more or less depending on the dish you use)
1 egg
1 and a half cups milk
salt and pepper, to taste
how to make my Nan's Moussaka
First of all, get a large frypan and warm up some vegetable oil. Peel your potatoes and slice them into large rounds (not too skinny) Fry them both sides until browned nicely. Set aside onto some absorbant paper then place in the base of your ovenproof dish. Now get another saucepan onto a burner and fry your onion in a little olve oil. When softened add your mince and turn up the heat. Keep stirring, makng sure you get all the lumps out. Meanwhile keep doing your chips as you'll need enough for a top layer too. When the mince has been browned off, place over the bottom layer of potatoes, then place the remaining cooked potato chips over the top of the mince. Now whisk your milk, egg and salt and pepper together. Pour over the whole dish. Finish off with a sprinkle of salt and pepper over the potatoes and bake in the oven for 30 - 40 mins until the egg/milk mixture is set!
Happy Birthday to all those other Virgos out there!
Saturday, August 14, 2010
I heart lemon and passionfruit marmalade
After making the Tangello and Clove Marmalade it got me thinking about other citrus fruits; what other combinations would work? My thoughts turned to lemons. The juice is used a lot in jams but you don't see it used as the core ingredient very often. So then I thought about what would "go" with lemons. I'd need to add a lot of sugar, I knew that, but I didn't want that to be the sole flavour of the marmalade. Wondering around the fruit market I spyed some rather beautiful looking passionfruit. Of course!
I am sooooo happy with the way this marmalade turned out. My Hubby loves it too!
This recipe makes 2 small jars or approximately 500ml.
ingredients
2 eureka lemons (they have no seeds. If you can't find them then you will need to remove seeds as you slice), cut in half lengthways, then thinly slice
750ml water
3 cups white sugar
2 passionfruit, cut in half and scraped, juice and seeds kept
how to make your lemon and passionfruit marmalade
When you have sliced your lemons pop them into a plastic container. Add the water and leave overnight (Approx 8 hours) or if you don't mind the texture of the rind then soak for about 3 hours. I have to say I like it both ways!
When ready to use pop the mix into a large heavy based saucepan and bring to the boil. Then simmer on a highish heat for 20 minutes. Now add the passionfruit pulp and 3 cups of white sugar. Bring to the boil then have on a mid simmer for about 20 - 30 minutes for the mix that you only soaked for 3 hours or if you soaked it overnight then it will only need simmering for about 10 - 15 minutes.
Wash your jars and keep them in hot soapy water in the sink until ready to use then rinse in hot water (don't dry them) and then place in the mcrowave, one at a time, for 1 minute. Have the lids in a saucepan of water on the stove on a rolling boil.
You will have to watch that your marmalade doesn't catch on the bottom and burn. Stir it every now and then to check it and pop some small plates into the fridge. When you think it may be ready or you are unsure just test some jam on a cold saucer. If it's ready it should thicken up, gel and wrinkle when you push your finger through it. When ready, ladle into your jars right up to the top, pop your lids on tightly and then you can do one of two things: You can place them into a saucepan of water, ensuring the jars are well covered then bring to the boil and boil for 20mins to create a vacuum. Check jars that a vacuum was created. OR
Once you've filled the jars turn them upside down until they have completely cooled. The old women of Tuscany use this trick which does work really well too however if using this method I would keep the marmalade in the fridge once it had cooled down.
Beautiful with croissants. That tart taste cuts through the butter perfectly.
Monday, August 9, 2010
fast food - winter garden burger
This is one meal that can be made fast! and it tastes YUM. When it comes to burgers I don't mind beetroot or cheese or even pineapple! but a few years ago I had some mince in the freezer, in the fridge I had some sad looking cherry tomatoes, some limp spinach,a few mushies on the edge and in the pantry a couple of rolls to use up. I'm sure we've all done this at some point - not wanting to make the trek to the shops so we search out the Kitchen to see what we can create?
What would MacGyver make under these circumstances?
Make sure you have everything chopped and ready to go as it's all cooked on the fly and ready to devour in about 5 minutes. I kid you not! enjoy.
ingredients
1 burger per person
120g mince - per burger
some grated carrot or turnip or zucchini or nothing, it's up to you - per burger
salt and pepper and chopped parsley, to taste - per burger
2 large flat mushrooms, chopped finely - per burger
1 sprig of thyme - per burger or to taste
4 - 5 cherry tomatoes, scored at one end - per burger
5 or so pieces of baby spinach or english spinach - per burger
1 egg - per burger
bbq sauce
butter
rolls
how to make your winter garden burger
Have 2 saucepans ready to go - one with oil the other with about 1 - 2 tablespoons butter. Score one end of each of the tomatoes. chop your mushies. Cut your rolls in half and get them ready under the grill. Take your egg(s) out of the fridge. Wash and seperate your spinach into individual pieces. Throw your mince into a bowl and add some grated vegetable, if using. Add your salt, pepper and parsley to taste. Give it a good mix then make into patties. Turn the heat on for the saucepan with the oil to about medium. Wait till it's hot enough then add your patties. Now put on the other saucepan on high heat and throw in the tomatoes. Turn on the grill to low. Turn your patties when they have browned nicely on the bottom. Throw in the mushies, some salt and thyme with the tomatoes, keep stiring. Crack your eggs next to the patties, use rings if you don't want to mix the 2. Add the spinach to the mushies and tomatoes, keep stirring. Everything should be ready by now. Take out your rolls and butter them. Top one with bbq sauce. Place your pattie on top of the sauce, then the egg. On the other half lay the spinach, the mushies and then top with the tomatoes. mmmmmmm, burger.
Monday, July 26, 2010
Smashing Pumpkin soup
My first, second, third, fourth, fifth and sixth memory of Pumpkin soup all happened in the same week. When I was about 13 my Mum and I took a bus trip to Melbourne to see "The Phantom of the Opera" and each night on our way there and back we stayed at a different motel where the evening meal was provided. The first night was a lovely pumpkin soup followed by beef wellington followed by apple pie and icecream. The second night was pumpkin soup, beef wellington and lemon cheesecake. A co-incidence we all thought. The third night was Pumpkin soup, beef wellington and Apple pie and icecream again. This was too funny. By the fourth night we started comparing recipes. "Well, I think Albury's pumpkin soup was much better than Wangaratta'a!", they'd say. "What? How about that beautiful sour cream art work in Goulburn!" Seriously.
Each soup was different but there were definate similarities. The taste of delicious sweet leeks,creamy pumpkin and of course what would pumpkin soup be without sour cream and snipped chives. Perfect. I hope you enjoy my version of this traditional soup. It is so simple.
ingredients
1 tablespoon each of oil and butter
1 brown onion finely diced
1 leek (approx 100g) finely sliced white part only
2 cloves garlic finely chopped
1/2 teaspoon nutmeg
1 kg butternut pumpkin chopped into 2cm cubes
1 litre chicken stock
Black pepper, chives and sour cream to serve
How to make your pumpkin soup
Warm up the butter and oil in a large pot. Add the onion and leek and sweat over a low heat until very soft and sweet smelling. Make sure they don't colour. Next add the garlic and nutmeg and stir over medium heat until fragrant. About 30 secs. Add the pumpkin and give it a stir. Then add your stock. Bring to the boil over a high heat. Once boiling reduce to a moderate temp and simmer for 30 - 40 minutes until the pumpkin is soft. Take off the heat and using a hand blender blend until smooth. Ladle into bowls and dollop a blob of sour cream in the middle, scatter some snipped chives and crack some freshly ground black pepper. Serves 4 - 5 people
Enjoy!
Friday, July 23, 2010
Dreams are funny - Tangello and Clove Marmalade
Since making the Quince jam I've thought a lot about what jam I would like to create. Many combinations have bounced around my brain, knowing some of them will have to wait until Summer when the ingredients are at their peak. A while ago I attempted a Rhubarb jam based on a Donna Hay recipe, except, that I completely burnt the bottom of the pan and it took me a week of scrubbing and soaking to get it back to normal. So maybe the universe was trying to tell me something - get over the rhubarb fixation and move on, Freak! I put jam making on the....back burner as it were.
Until......
Apparently Stephenie Meyer had a dream about a vampire named Edward and a human called Bella, thus 'Twilight' was created and I remember reading somewhere that the melody to the song, 'Yesterday' came to Paul McCartney in a dream. Well, a little while ago I had a dream that I had another baby. As my Husband held her in the Hospital and I watched with that after-birth exhaustion he asked me, "What shall we call her?" I responded with, "Tessa". After teling my Husband that morning and laughing it off and thinking about if for the day it finally came to me that the Quince jam that I made belonged to a recipe by Tessa Kiros. Ok,Ok, so maybe the dream didn't mean anything but it made me start thinking about my next jam adventure and this is what I came up with.
ingredients
3 Tangellos (790g approx)
200g dried apricots (The best you can afford)
1.25 litres water
4 whole cloves
2 tablespoons fresh lemon juice
6 cups white sugar
How to make your Tangello and clove marmalade
You will need to start this the night before. Wash your tangellos under hot water (leave the skin on)then cut in half and then cut thin slices from each half. Place in a very large plastic bowl. Chop up 200g apricots roughly and throw them in the bowl too along with 1.25 litres of water. Throw in 4 cloves, cover bowl with plastic and leave in a cool spot overnight.
The next day pull out the cloves and discard then pour the remaining mix into a large heavy based saucepan with the lemon juice. Bring to the boil. Once boilng, reduce to a simmer and simmer for 45minutes. Stir every now and then to make sure everything is ok. Once your 45minutes are up add your 6 cups sugar, stir and bring to the boil.Once boiling boil for approx 40 mins. Now, I can't stress enough you are going to have to watch over this delicious goo like a hawk otherwise you will be scrubbing and soaking that pot for a week! I ain't kidding. Once you've brought it back to the boil keep it boiling or at least a high simmer but you will definately need to lower the heat over the 40 mins otherwise it will cook too fast, thus making a lovely black mess in your pot. An easy guide is if the mix is bubbling up the saucepan the temperature is too high. Keep it so that you can see the fruit bubbling in the mix. By the end of the 40mins the heat should be on your lowest setting but the marmalade will still be simmering away and when you pop it on a plate - it should start to look like a gell or wrinkle when you push your finger through it. Turn off the heat and now you are ready to ladle into jars.
When you are up to the last 40 mins make sure you get your jars ready. Give them a good wash in the sink with hot and soapy water just before the 40 mins are up. Pop the lids to the jars in a saucepan filled with water that is on a rolling boil. Boil until ready to use. When the jam is ready, rinse your jars in hot water, place in the microwave, 1 at a time for 1 minute each. Take out of the microwave with gloves or a heavy t-towel and place next to the jam. Using a very clean spoon ladle contents into the jar, all the way to the top. Using tongs grab your lid and then carefully, without burning yourself, screw the lid tightly. When you have filled all your jars with your yummy contents grab your other big saucepan (or wash the one you just used) fill it with cold water, place your filled jars in the water making sure they are well covered and bring to the boil. Once boiling, boil for 20 mins. Turn off the heat and allow to cool in the water. Check the lids on each bottle to ensure that a vaccuum has been created. Label jars and keep in a cool place for up to 6 months.
Enjoy!
Wednesday, July 7, 2010
Melt in the mouth - Lamb and risoni casserole
I love how the seasons influence our garden. Like in Summer our garden is filled with enough lettuce to feed about 100 hungry guinea pigs! and now in Winter, there is one lettuce left wondering where the hell the sun got too.... Turnips are in abundance at the moment. I've added them to my minestrone soup and my roast sausages with veg and they have tasted out of this world! I thought it was about time to create a casserole with a few of my favourite things: lamb, risoni, beans and of course hopefully get through some of the turnips that could quite possibly feed oooh, 1000 hungry guinea pigs.
ingredients
350g carrots, chopped into chunks
3 brown onions, peeled but left whole. (You could use eshallots if you like)
8 small turnips, left whole or 3 large turnips cut in half
2 sprigs of thyme
1 bayleaf
a few peppercorns
4 - 6 cloves of garlic, peeled but left whole
1 can of borlotti beans (or you could use cannelini beans or kidney beans)
1kg half roast lamb leg (no bone, fat intact)
200g - 400g piece of middle bacon (or you could use a sweet smoked ham portion or a ham hock cut into 3 pieces or you could omit and use a bacon stock instead of water)
water
1 cup risoni
250g green beans
salt and pepper
how to make your casserole
Pre heat oven to 170C. Pop some olive oil into a large pot over a lowish heat and throw in the first 7 ingredients, just to soften and to get the flavours going. Pop in the lamb and the bacon (if using)and cover with water. Not too much,as the end result will be too watery. Raise the heat and bring the water to the boil. Once boiling transfer to a large roasting dish. Mix through the beans, cover with foil and bake in the oven for 90 minutes. Take out and mix through risoni and green beans.Check seasonings and add salt and pepper if necessary. Cover with foil again and pop back in the oven for 10 minutes. When ready to serve, you can either discard the bacon or slice just a couple of pieces (1 per plate) as the hero of the dish is the lamb. The lamb will be absolutely delicious.It's up to you how you would like to serve it. Either plate it up or pop it all in a big dish and everyone helps themselves. You can strain the juices into a jug too so that people can drizzle a little over their meat if they wish. Serves 4
Enjoy on a cold night with a great glass of red.
Tuesday, June 29, 2010
How sweet it is - Stewed Rhubarb Icecream
My Mum bought me a lovely bunch of rhubarb from the local produce market in Kiama. I thought maybe a Rhubarb crumble would be a nice warm treat. I looked in the cupboard - everything I needed wasn't there. I knew I didn't have ingredients to make muffins or a cake either......hmmmm, what to make?.......Bing!
Stewed Rhubarb Icecream. This dessert is really easy to make and can be made well in advance. If you've got rhubarb to use up and some icecream in the freezer - you're all sorted!
ingredients
300g of rhubarb cut into 1 cm pieces
1 and a half tablespoons raw sugar
1/4 cup water
400g of icecream of your choice (I used Streets Blue ribbon Vanilla icecream)
Brown sugar to serve or caramel sauce if you're feeling fancy!
how to make your Stewed Rhubarb Icecream
Chop up the rhubarb and pop into a microwave proof dish with the sugar and water. Pop the lid on loosely. Put in the microwave for 3 mins. Stir. Then pop back in the microwave for 2 mins. The rhubarb will be very hot so be careful. Set aside to cool (I allowed 40 minutes). Mix stewed rhubarb with icecream quickly and spoon into bowls. You could also mix rhubarb with icecream and place back in freezer until your ready to serve. It's up to you. To serve, sprinkle each bowl with a little brown sugar over the top. Serves 4.
I think a home-made caramel sauce would also taste delicious over this dessert.
Thursday, June 24, 2010
Welcome back - Mushroom, Spinach and Fetta Quiche
When my husband and I were on our Honeymoon in Tasmania we tasted some pretty amazing food all over the Island. Lots of dishes stand out but some things are best enjoyed as memories. Such as the organic beef we had at Freycinat, there is no way I would ever do that dish justice! One food that we ate quite alot of was quiche. In Hobart there was this great little deli that had quiche lorraine and mushroom, spinach and fetta quiche in their window. They both were so delicious that whenever we were in Hobart throughout our stay we would go there and grab a piece, some beautiful bread, some vino, some olive paste and enjoy it all in a local park that overlooked the river. 6 years later and the memories are still so vivid to me. I hadn't made a quiche in ages but my son was in daycare for the day and my good friend was visiting me, it was time to get re-aquainted. This is my version of that dish.
ingredients
4 large flat mushrooms, sliced thinly (you can use 12 button mushrooms if you like, depending on availability and your presentation)
100g baby spinach leaves, stalks removed (you can use english spinach just remove stalks and all traces of grit)
100g of a good fetta cheese, crumbled
6 eggs
1/4 cup of milk (or single cream, it's up to you)
2 sheets of shortcrust pastry (depending on how big your quiche dish is)
knob of butter plus an oil spray
salt and pepper
how to make your quiche
Defrost pastry until flexible, about 15 - 20 mins. Pre heat oven to 200C. Grease or spray with an oil spray the base and sides of a quiche/tart pan (approx 21 cm diameter. If it's smaller than this just make sure that the sides are higher) Place pastry over tart pan making sure pastry hangs over the sides a little as the pastry will shrink in the oven. Prick the bottom a few times with a fork. Place over baking paper making sure the sides are covered. Now weigh it down with some rice, risoni or dried beans. You'll need about 2 cups. Place in oven for 10 mins. Now take out baking paper with weights, discard and pop back in the oven for 5 mins to brown very slightly. Take out and cool. Reduce oven temp to 180C.
Slice mushrooms. Heat pan with knob of butter on high heat. Add mushrooms, salt to taste and toss quickly. Add more butter if needed. When soft, take off heat.
Wash spinach then place in a heat prrof bowl. Boil kettle then cover spinach to blanch. Drain in a colander straightaway and refresh with cold water. Drain very well and set aside.
Crack eggs in a bowl, whisk in 1/4 cup of milk and pepper to taste. Place mix over pastry then arrange spinach on the bottom, fetta cheese in the middle and top with the mushroom slices.
Cook quiche for 20 - 25 mins or until the egg mix has set (just give it a little wobble to check)
Take it to a picnic or enjoy as a light lunch with a salad!
Sunday, June 20, 2010
Pretty fun! - egg free and dairy free cupcakes
If I were asked, "What are your favourite things in the whole wide world?". I would have to say, "Laughing with my Husband (usually at his bad jokes); Falling head over heels for some little thing at a vintage shop and lastly, eating pretty little cupcakes".
Don't worry about the lack of dairy or egg, these cupcakes taste like Heaven! They are so light and fluffy, they seriosly just melt in your mouth. The addition of chocolate for me is just for comfort, you could use custard powder instead if you like. I made a batch of these for a combined family birthday using a red and yellow theme with icing and lollies. They looked very cute but you can decorate them however you like and they are great for anyone with dairy, egg or nut allergies. Have fun!
ingredients
3 cups Self raising flour
2/3 cup cocoa powder
pinch of salt
2 cups caster sugar
2 cups water
2/3 cup vegetable oil
1 tablespoon vanilla essence
1 tablespoon lemon juice
icing
3/4 cup Nuttelex margarine
2 cups icing sugar mixture
1 tablespoon hot water
1/2 teaspoon vanilla extract
Colourings and decorations
how to make your cupcakes and icing
preheat your oven to 180C or 160C fanforced if using 2 levels in your oven.
Use an oil spray to prep your muffin trays or use pretty cases.
Sift flour, cocoa powder and salt into a large bowl. Stir through the sugar.
Combine measured water, oil, vanilla and lemon juice in a separate bowl. Whisk this into the flour mix untl smooth. Divide mix among cases (if using) or directly into muffin pans. Bake for appox 25 mins.
When the cupcakes are ready. Take out of tray and cool on a rack. If icing on the day then allow to cool completely, then ice and serve. If icing the following day, cool completely then pop into a sealed container and keep in the fridge. You can ice on the day or the day before if you like. Iced cupcakes will keep in the fridge for up to 2 days before eating in a sealed container (and they still taste fabulous!) Decorate just before serving.
Tuesday, June 15, 2010
Tiny treats - Chocolate fudge
I came across this recipe years ago. It's one of the easiest recipes you'll ever find and deliciously rich depending on the chocolate you use. It's so worth making every now and then as a special treat for a party or even as a gift. Enjoy!
ingredients
400g dark chocolate (you could use milk chocolate or half/half)
1 cup sweetened condensed milk (the 300g can is perfect)
60g butter
How to make your fudge
Place all ingredients in a saucepan and stir over low heat until smooth and glossy. AND that's it!!
Place into a small slice tin which has been lined with some baking paper and smooth over. Decorate the fudge if you like with some cashous or other pretty things.(The cashous are a little crunchy so I've added them after the fudge has set purely as decoration)You could also incorporate some chopped roasted almonds too!
Now pop your fudge into the fridge for at least 2 hours. Prior to serving cut into small bite size pieces and leave out for about 10 mins.
Cumin get it! - Vegetarian pie
The flavours in this dish always remind me of a beautiful Lamb stew that has been braising on the stove for a couple of hours. Except, there's no meat in sight. This is a vegetarian pie or hot pot I guess you could also call it. Whatever it is, it's YUM!I also love the ground cumin in this dish. I think it just takes it to a whole new level as opposed to using say, Thyme or oregano.
When you want to feed a number of people then make this! Everyone will be happy. If you do have a few die-hard-meat-eating males, just bbq some lamb chops for them (or better still get them to do it!). That should keep them quiet... Trust me, everyone will love the flavour of this dish.
ingredients
500g butternut pumpkin, peeled, deseeded, cut into 3cm cubes
300g flat mushrooms chopped into small pieces
2 carrots, peeled and coarsely chopped
2 zucchini, coarsely chopped
1 leek, white part thinly chopped
2 garlic cloves, finely chopped
1 tablespoon ground cumin
1 x 800g tin of chopped tomatoes
250ml vegetable stock
2 x 400g tins chickpeas, drained and rinsed
250g green beans, topped and chopped in half
chopped fresh coriander (I like to use the whole bunch but you can use a half cup if you like)
6 desiree potatoes, unpeeled and sliced thinly
approx 1 cup parmesan cheese
how to make your pie
heat some oil in a large saucepan over medium high heat. Add the pumpkin, mushroom, carrot, zucchini, leek and garlic and cook, stirring for 5 mins or until leek softens. Pre heat oven to 180C.
Add the cumin and atir for 30 secs until arromatic.
Add the tomato and the stock and bring to the boil. Reduce heat to medium low and cook covered stirring occasionally for 15 mins. uncover and simmer for 10 mins. Add the chickpeas and beans and cook stirring for 5 mins or until beans are bright green. Add the coriander and stir to combine.
Place mix in a large ovenproof dish. top with the potato slices slightly overlapping. Sprinkle with the parmesan cheese (to taste). Bake in the oven for 40 mins or until potato is cooked through and slightly browned.
Serves 6 - 8 people with a rocket salad, some beautiful bread (our friends brought some Garlic Brasserie bread which was to die for) and some white wine.
#I also made a Caraway damper to accompany this dish except that I didn't cook it long enough. Left with pure dough in the middle, we ate the yummy bits, which were yummy but yes, dough = not yummy. So I will work on this recipe and when I've perfected it, I'll pop it up on the blog.
Subscribe to:
Posts (Atom)