Tuesday, November 30, 2010

If I can make this, so can you! - Apricot TarteTatin


At the moment I am flicking through magazines and cookbooks in search of the perfect dessert! It'll be our Christmas treat when we catch up next with Caroline and her family. So many yummy things! So little time!!
I realised I couldn't wait till then so here we are, on the eve of Summer, and I thought I would try my luck at creating a Tarte Tatin recipe. I've never made one before but as they say there is always a first time for everything.
I used my tart tin, you know with the 6 tart moulds built into it. I thought it would be cute to make individual ones. When I brought them out of the oven I wondered how in the hell I was going to get them out. So I layed out some greaseproof paper and quickly flipped over the tin. Out came 6 beautiful little tarte tatins. I cannot tell you how excited I was. I had facebook status updates running through my head and all sorts of things. They looked exquisite. They even tasted exquisite. Enough said. Make them! Make them NOW!


ingredients

170g brown sugar
100ml water
50g unsalted butter
apricots approx 1 per tarte tatin (or you could use any fruit you like. I originally thought Mango but had some lovely ripe apricots so used those instead)
2 sheets of butter puff pastry


how to make your Apricot Tarte Tatin


Take out your pastry to defrost. Pre-heat oven to 180C.Get out the tin you want to cook the tarte tatin's in. In a small saucepan add the brown sugar and water. Stirring, bring to a boil and then turn down to a low heat. Simmer gently for a few minutes until mix thickens a little. Take off the heat and add the butter, whisking it through. (There will be enough caramel to make approx 18, 9cm diameter tarte tatins)

Add some of the caramel to each base. Add the sliced apricot (or fruit of your choice) and top with the pastry, ensuring that you tuck all edges into the pan.
Pop in the oven and bake for 20 minutes or until golden brown on top.

Get a knife and go around each tarte tatin then over a piece of baking paper, flip it over. They should all come out perfectly and this should blow your mind!!!

Serve immediately with vanilla ice cream. enjoy!

Friday, November 26, 2010

high tea - part 3 - broad bean puree with herbed oil and toast


This recipe, along with the previous two, were all swimming around in my head while we were away on our break. I'd been reading an article about Stephanie Alexander who was talking about Broad beans and how she liked to have the first few of the season, fresh. She made them sound sooooo moreish. So, not knowing a lot about them, I thought I'd have a play around.....and I still am really!

On the day of the high tea, everyone said that they really liked the puree (unless they were all being very kind!) There was something about the flavour I wasn't too sure about (I'd also forgotten to take off the 2nd layer of the bean which made the puree a little grainy - as Caroline's husband said, "It's like pesto") So I've re-jigged the recipe a little. In the original I added parsley to the puree but don't think it was necessary and also added a little too much oil. Hold back on those two and the true flavour of the broad bean really shines through. See what you think....

ingredients


serves 4

500g broad beans (pod them the night before. You'll need about a cup)
1 tablespoon salted butter
salt and pepper
1-2 teaspoons fresh ricotta
extra virgin olive oil
1 thyme sprig per person plus 2 extra
bread of your choice to serve

how to make your broad bean puree with herbed oil and toast

Put 1/2 cup of the olive oil into a bowl and add the 2 extra thyme sprigs. set aside. Just before serving discard thyme sprigs.

Pop oven on to 200C. Grab your bread and cut into rough slices (or however you like) Place them on a baking tray lined with baking paper and drizzle with some extra virgin olive oil. Pop in the oven for 10 -15 minutes, or until crisp.

Pop a saucepan of water on the stove. When boiling add the broad bean and boil for about 2 minutes. Drain. When you can touch them without burning yourself, take off the outer layer of each bean and discard. Now you are left with a soft and juicy green thing that looks like a large slightly morphed pea!
Pop them in your blender and add the butter and ricotta. Blend to a puree. Spoon into a bowl and add salt and pepper. Stir and check seasonings.
I thought these looked cute served individually but you can do one large dish, of course. Dollop puree into serving dish, drizzle with a little of the oil and then top with a sprig of thyme. Serve with the toast. Enjoy!

Tuesday, November 23, 2010

high tea - part 2 - spring pea morsels with dill and lemon creme fraiche


Whenever my Mother-in-law pops over for dinner I always do a roast of some description and she always brings along fresh peas.I don't know how that started but it's become a little tradition of ours. The roast and veggies go in the oven while we sit around, shell peas (and eat the occasional one too) and share stories.
The taste of fresh peas at the moment are out of this world!! It is Spring after all!.So that's really how this recipe came about. I wanted to use fresh peas and not too many other ingredients to make something yummy and simple. You don't have to serve them with the creme fraiche as it is a little expensive, I know. You could use sour cream if you prefer, or I've even popped these in pita bread with tomato sauce sauce for the kids and BBQ sauce for us - delish!!

ingredients

makes approx 15 - 20. Depending on how big or small you make them.

180g - 200g fresh peas, bit more than a cup of peas (you'll need approx 500g before podding)
1 large potato, cooked (Do this this the night before and keep it in the fridge until you're ready)
1/2 clove garlic, crushed
approx teaspoon of fresh chives, finely chopped
1 tsp baking powder
1 tablespoon of plain flour, plus a little extra flour for rolling morsels in
salt and pepper


about 125g creme fraiche (You could make double the amount of morsels and use the whole container of creme fraiche)
a few sprigs dill
about a teaspoon of lemon juice

Mix through the creme friache and the lemon juice and top with the dill sprigs. Make this just before serving. (I forgot to take a photo of the creme fraiche on the day so sorry you can't see the two together but it looks really pretty with the dill sprigs. Not to mention the lovely fragrance and the delicious taste!)


how to make your spring pea morsels


Shell the peas the night before so you won't have to worry about them on the day as it can be a little time consuming. (but sooooo worth it).Get the whole family involved!

On the day: Blanch the peas in boiling water for a minute or so. Drain and place in a blender (I use a stick blender which I LOVE!) add the garlic and give it a quick wizz. Now get out your potato and give it a good mash. Add the puree to it, along with the baking powder, flour and chives. Add salt and pepper to taste and give it a good mix.

Get out your fry pan pop in a good slosh of olive oil and set to a medium heat. Roll each morsel in flour lightly and set aside on a plate. When the oil has heated enough drop in the little morsels and fry. Try and pop them in all together so you'll have a similar cooking time for all of them. When lightly browned, flip over (Careful, it is a wet mixture and turn down to low so that they cook through but don't burn. Mine look just slightly overdone but they were still yummy!) When ready, drain on absorbent paper (if you like) and then pop on your serving platter with the dill and lemon creme fraiche on the side.

Don't forget the toothpicks so your guests can get at those morsels and woof them down! YUM-YUM.

Wednesday, November 17, 2010

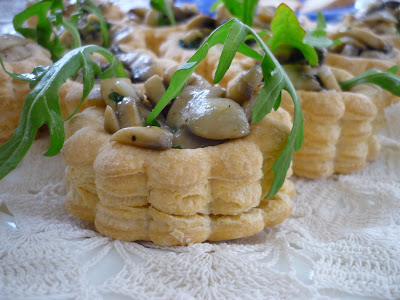
high tea - part 1 - herbed mushroom and ricotta vol-au-vents


While we were away we spent a couple of nights in Kiama either side of our break to stay with family. We decided to eat at a restaurant that had been around since I was little and I hadn't been there in years. It was time to have a taste of "Chachi's".

Hubby ordered the pasta with chorizo and the kids got pizza and ice cream (a winning combination in our household)and I had the crostini. Which reminds me of another story...... Some of the girls in my mothers group branched out a few years ago and created a book club. A recent book was, "The Road Home" by Rose Tremain. The main character Lev works in a fancy restaurant in London where the head chef makes the staff his famous crostini each night before their big night ahead.......I really had to have that crostini.

It was perfect. Delicious crusty bread, slightly salty ricotta, mushrooms tossed with garlic and fresh, fresh rocket leaves. So simple and so delicious. Here's my version in a vol-au-vent!

ingredients

makes approx 12 medium sized vol-au-vents(I used Erica's kitchen brand which had 6 in a pack but you could always use smaller ones if you are feeding more people or use a different brand - buy the best you can afford)

2 tablespoons butter
approx 12 button mushrooms, sliced finely
1/2 clove garlic, crushed
small mix of finely chopped fresh parsley and Fresh thyme
salt and pepper

fresh ricotta from the deli, about 150g

rocket sprigs, 1 per vol-au-vent

how to make your herbed mushroom and ricotta vol-au-vents


If you have the time, warm the vol-au-vent cases very slightly in the oven.
Heat butter in a saucepan over a high heat. Quickly fry mushrooms with the garlic, herbs and a little salt and pepper. When cooked through, adjust seasoning if needed and set aside. Dollop ricotta into the base of each vol-au-vent case. Top with mushroom mix and then add a sprig of rocket.

Serve as part of a high tea, afternoon tea, brunch or even a lovely light dinner. enjoy!

Tuesday, November 9, 2010

Heaven on a piece of toast - Pink Lady Apple and Strawberry Jam


My good friend Caroline from Fox Drink Water popped over on the weekend with her family for a morning of jam making! I was attempting to show them my skills and in the process nearly burnt the goods! but all was not lost.... it was rescued just in the nick of time. One more second and it would have made very fancy worm fodder.....

Over the next couple of posts I'll be sharing a few of my recipes that I tried out on Caroline and the fam. Two I am still perfecting and one I am very pleased with. My idea was to have a High Tea without boring old sandwiches, meat or eggs. I wanted it to be relatively easy too as we were meant to be concentrating on the jam! Caroline brought her absolutely delicious pumpkin scones that went down a treat!!!

The combination of Pink Lady Apple and Strawberry was something Caroline wanted to try (I think it is heaven on a piece of toast) and really you could use any apple that was in season. You could also use raspberries in place of strawberries if you like. I hope you give it a go!

Oh, and the absolutely gorgeous Jam and Toast holder will be for sale in our Etsy shop some time in the future.....watch that space!

ingredients

3kg pink lady apples, Peeled,cored, quarted and sliced (You should have approx 1.8 to 2kg once they have been peeled and cored)
500g strawberries, hulled and sliced in half
just under 1/4 cup lemon juice
some lemon zest if you like ( I popped in about a teaspoon)
2 cups or so of water
800g white sugar

how to make your pink lady apple and strawberry jam


Grab a large pot with a lid and as you cut your apple slices, throw them in. Throw in the strawberries and add your lemon juice, zest if using and water. Pop the lid on and and place over a high heat. Once it's boiling, turn it down to a very gentle simmer, stir occasionally, pop the lid back on and let the fruit very slowly soften. When the fruit looks very, very soft (the apple pieces should mostly look like mush with some pieces kind of holding their shape)Keep the lid off, add the sugar and turn up the heat. It shouldn't be long now till your jam is ready. Pop a few saucers in the fridge and every now and then grab one out and pop a teaspoon of jam. It shouldn't weep and when tilted the jam should stay and not be too runny. You can also push your finger through it (be careful it will be hot) if it wrinkles it's ready! Careful not to burn your jam as it can turn on you. Turn the heat down a little if you're unsure.

The sterilisation process


Wash your jars and keep them in hot soapy water in the sink until ready to use then rinse in hot water (don't dry them) and then place in the microwave, one at a time, for 1 minute. Have the lids in a saucepan of water on the stove on a rolling boil.

When ready, ladle into your jars right up to the top, pop your lids on tightly and then you can do one of two things: You can place them into a saucepan of cold water, ensuring the jars are well covered then bring to the boil and boil for 20mins to create a vacuum. After 20 mins, turn off heat and allow to cool in the water. Check jars that a vacuum was created.
OR
Once you've filled the jars turn them upside down until they have completely cooled. The old women of Tuscany use this trick which does work really well too however if using this method I would keep the jam in the fridge once it had cooled down.

Keep boiled jars in a dark, cool cupboard. They should keep for up to 1 year.

Wednesday, November 3, 2010

Honey Roasted Pumpkin Salsa


We've just arrived back from 2 glorious weeks down the South Coast. It's been heaven eating out nearly every night or buying fresh fish from the markets and cooking it simply on the BBQ. Other than that I've hardly cooked at all (except for the previous blog post - but you can hardly call that cooking!). One of our favourite places to eat over the past couple of weeks has been a humble pie place called, Hayden's Pies. They have everything from: Masaman curry; Roast chicken and leek; Chunky steak with mashed potato; Atlantic salmon and king prawn, to name a few. One pie in particular caught my eye - Honey roasted pumpkin with spinach and feta. It's difficult to describe the taste but I simply couldn't get enough of them! I had to do something with this. I had to roast pumpkin in honey!........It's not a salsa as such, I know, but the coriander and the lime definitely take me there. Enjoy!

ingredients

piece of butternut pumpkin (enough to give you about 250g) peeled and chopped into bite size pieces
tablespoon of honey
100g sugar snap peas, topped and blanched
small handful of coriander leaves
a few sprigs parsley
small handful of beetroot leaves
1 lime

how to make your honey roasted pumpkin salsa


Pre-heat oven to 200C. Place bite size pumpkin pieces onto some baking paper on a tray, drizzle with the honey and bake for 40 mins. (You want the pieces to cook through but not char)

Just before the pumpkin is ready blanch the sugar snap peas and wash the leaves and the herbs. Drain well.

In a bowl toss everything together gently and season with salt and pepper and a good spritz of lime juice.

Serve with a wedge of lime. Serves 2 as a light lunch or serve with lamb cutlets or fish for a more substantial meal.